Wednesday, January 30, 2013

Bird Cage // Card Banner

Here is a really simple banner that is made using scrap book paper, string, and glue.
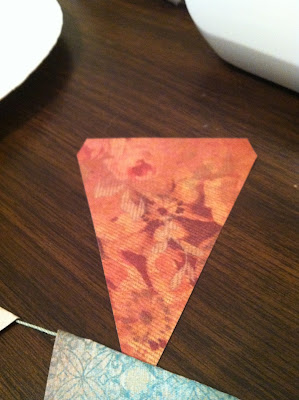
Cut five triangle shapes like this (with an area to fold over) out of pretty scrap book paper.

I would suggest using E6000 glue to fold the top over a string or ribbon and glue, but I used a hot glue gun because I really enjoy how fast it dries. I cut the letters out of contrasting scrap book paper but stenciling or using stickers works great and is a lot easier!
The folded edge should look like this.
Use a bone folder to smooth out edges and to smooth on letters with a thin layer of craft glue.


Here is the finished product! It worked out really well and looks great! A really cheap way to add a beautiful detail!

Thursday, August 2, 2012

Here comes the bride

I know I didn't post hardly any of the projects but I took pictures of it all and will work on getting the projects up now. We have been married for a month now and are settling in to married life. So fun! I am going to start a blog on our DIY projects around the house!

Let's get started. For the ceremony I had 3 little girls and my little brother carry signs that said "here comes the bride."

I found four similarly sized frames at a thrift store and they were $.50-$1 each. I had friends help paint them all in my color (sea foamy bluish).

For the inside I had the husband cut out cardboard that fit perfectly inside the frame (most of them came a just the frame but if your frames have the backing in them, just use that).

Super easy so far!

I played around a lot on how to make the words inside. If your frames can hold a sheet of computer paper I would suggest printing them. I used different scrapbooking paper for the background and painted the words on with the same paint.

If you can print them, cut your pretty paper to fit into the printer and frame and simply create your words in a word processing program.

Finally put all of the pieces together! Place the paper in and then the cardboard. Ta da! Super easy, super cute! They all looked darling carrying those signs.
Thursday, January 19, 2012

Thank You Tags - for BottleCap Favors

How the Guest's will Receive Them 
The Smaller Ones We Did
These tags were simply cut out by a scalloped tag punch, which I got a Michaels. It was originally $17.99 but I bought it will a 40% off coupon. We used heavy weight craft card stock and we chose to use a natural color for the organic look. 


Then we used a very small hole punch to punch all the holes, you can get these at almost any scrapbooking or craft store, we used a high quality one so we could punch through multiple at a time but you can find them pretty cheap. 


Now stringing them with such a small hole proves to be very difficult. So what I did was use a large eyed embroidery needle that i usually use for bookmaking. In the        larger ones I used the threads of burlap from our ring bearer pillow (post on that to come) and for the smaller tags I used cotton based yarn. For the yarn I just threaded all the tags on the continuous string and then pulled one to the end and cut it and tied it. That way all the others were still farther down the string and I only had to thread them once. 


You could embellish these little tags with anything you want! We wanted to say thank you to our guests for sharing our special day. To do this I took my tiny alphabet stamps and formed the words "thank" and "you" separately. I held them together with a paper clamp and it made stamping these a breeze! This was mostly to save money but also to give it that organic handmade look. 


Try using other stamps and gluing papers to them. The possibilities are endless and once you have the punch you can use them for anything! Gift tags, canning tags, ornaments, etc. 
The Yarn - $2-$3 at craft stores

Tuesday, January 17, 2012

Delegating

In looking for cakes I struggled with the idea of putting such a focal point into someone else's hands. Then I found this, on Pinterest of course, and fell in love. It is so simple almost nobody could mess it up, and I can still make the flower myself! 


My orignal idea was to have CAKE POPS instead of cake. But, if you have made cake pops before you understand what a lengthy process it is. So, I will settle for having a small cake with beautiful bouquets of cake pops surrounding it. Look for an update on the making of this flower as the wedding date approaches and as soon as I find a posse willing to roll, dip, and sprinkle a significant amount of cake pops I will post that excursion as well. 

Wedding Cake - Pinterest

Monday, January 16, 2012

Our First Official DIY Project-BottleCap Favors!

Jeffrey works at an up and coming company known as Bottle Cap Co.
Check them out! They gobs and gobs of supplies for tons of different projects!
      It only seemed right to factor our connection to such a great company into our wedding, so here I present our bottle cap favors! 
      We decided to create our own images to be placed inside but they also sell many designs! Even editable versions that you can customize yourself!


What You'll Need:
1" circle punch
1" circle images
Craft bottle Caps
Adhesive (we recommend E6000)
Small circular magnets
1" Epoxy Dots
All of this is available in one convenient place at their website! Some items, such as the 1" hole punch, can be found cheaper elsewhere but don't sacrifice too much quality. Especially when it comes to the epoxy dots and magnets. Poor quality of either will result in a really sad looking bottle cap that won't hold up anything on the fridge. 


First begin by gluing a magnet to the back of each bottle cap. 
While this is drying you can move onto cutting out all of your images with the 1" hole punch. (Fiskars sells a good one, and its easy to use design will make everything much easier.) 
Place a very small dab of adhesive on the inside of the bottle cap and center your image. 
Then center an epoxy dot on top of that. 


When it is all dry, you have yourself a customized magnet! 
We can't wait for our guests to receive these crafty creations!